Direct Answer
To create a Discord server, click the + button in Discord, choose Create My Own, enter a server name, add an icon, and click Create. You can customize the server from Server Settings and create channels using the + button beside a category. To delete a channel or server, open its settings and select the appropriate delete option. Deletions are permanent.
Discord is a popular communication platform for chatting, sharing files, making voice and video calls, and building online communities. A Discord server gives you a dedicated place to bring people together, while channels help you organize conversations around specific topics.
Creating a server is easy, but a new server can feel a little confusing when you first see all the available settings. You may want to change its name and icon, add a banner, create channels, adjust channel settings, or remove channels you no longer need.
This guide explains how to create a Discord server, customize its appearance, create and customize channels, delete a Discord channel, and permanently delete a Discord server. The steps focus on the desktop and web versions of Discord.
- Watch: How to Create, Customize & Delete a Discord Server
- What Is a Discord Server?
- What Is a Discord Channel?
- How to Create a Discord Server
- How to Customize a Discord Server
- How to Create a Discord Channel
- How to Customize a Discord Channel
- How to Delete a Discord Channel
- How to Delete a Discord Server
- Discord Server vs. Discord Channel
- Final Thoughts
- FAQ
Watch: How to Create, Customize & Delete a Discord Server
Want to see the entire process in action? Watch our step-by-step video to learn how to create a Discord server, customize its profile, create and customize channels, and delete a Discord channel or server.
The video follows the same steps covered in this guide, so you can watch along and then use the detailed instructions below whenever you need them.
What Is a Discord Server?
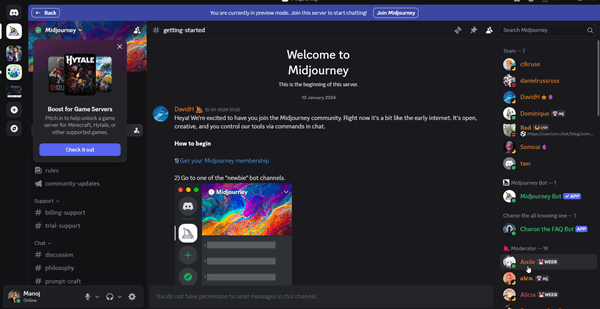
A Discord server is a dedicated space where a group of people can communicate and share content. You can create one for friends, a gaming group, a school club, a professional community, or a topic such as blogging, SEO, or digital marketing.
Think of a server as the main home for your community. Inside that home, you can create smaller spaces for specific conversations. These spaces are called channels. Discord servers can also include voice channels, where members can talk using their microphones, and other channel types designed for specific community needs.
For example, a digital marketing community could have a server called Digital Marketing Hub. It could contain channels such as #seo, #blogging, #social-media, and #web-hosting. Members can then choose the channel that matches the subject they want to discuss.
This structure makes Discord more organized than putting every conversation into one large chat.
What Is a Discord Channel?
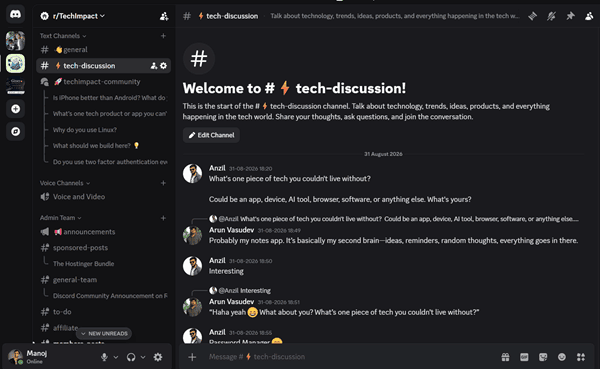
A Discord channel is a conversation space inside a server. Each channel has its own purpose and chat history.
A text channel is designed for written conversations. Members can post messages, images, links, and files.
A voice channel lets members join a voice conversation. Depending on the available features and permissions, members can also use video and screen sharing.
Discord also supports other channel types, including forum-style channels for communities that need more structured discussions.
The key idea is simple: the server is the main community, while channels organize the conversations inside it.
For a new server, you don’t need dozens of channels. Start with the topics your members actually need. You can add more as the community grows.
How to Create a Discord Server
Creating a Discord server takes only a few steps. Discord provides a simple setup process that lets you start with a basic server or use a template to get some initial structure. You can then change the server’s name, icon, and other settings after it has been created.
If you’re completely new to Discord, don’t worry about getting every setting right during the initial setup. You can customize the server later. The most important step is choosing a clear purpose and name so members understand what the server is about.
1. Open Discord
Start by opening Discord on your computer.
You can use the Discord desktop application or access Discord through a supported web browser.
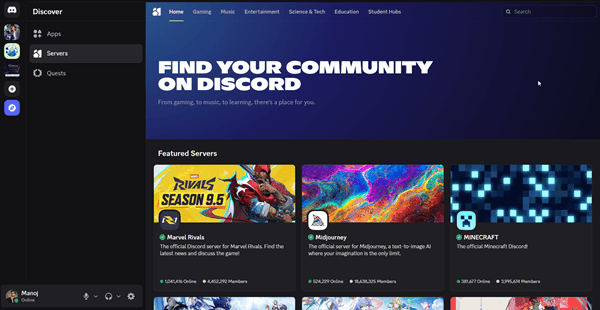
Sign in to your Discord account if you haven’t already.
Once Discord opens, look at the left side of the window. You’ll see your direct messages and the servers you already belong to.
2. Click the Plus (+) Button
Look for the plus (+) button in the server list on the left side.
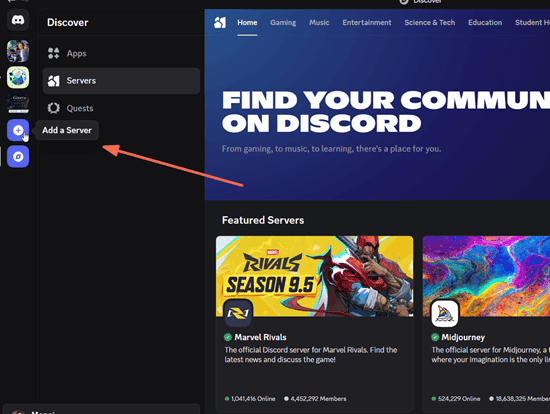
Click it to start creating a new Discord server.
Discord will open the server creation window. You may see options for starting from a template or creating your own server.
3. Choose How You Want to Use the Server
Discord may ask what you plan to use the server for.
You may see choices related to friends, communities, gaming, clubs, or other uses.
Choose the option that best describes your planned server.
Don’t worry if you change your mind later. The choice you make here doesn’t lock your server into a permanent format.
4. Choose to Create Your Own Server
If you want complete control over the setup, select the option to create your own server.
Discord may also offer templates with starter channels. A template can save time if you want a basic structure without creating every channel yourself.
For this guide, we’ll create a server from scratch.
5. Choose Who the Server Is For
Discord may ask whether the server is for a smaller group of friends or a larger community.
Select the option that fits your goal.
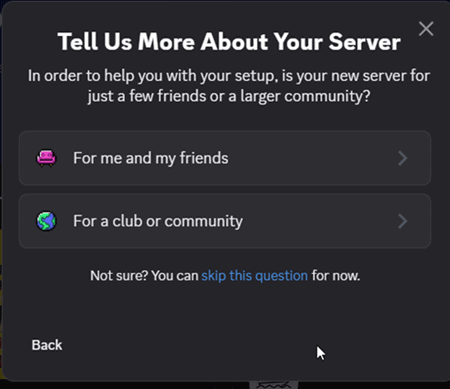
If you’re creating a server for a small group of people who work together on a blog, for example, you can choose the option intended for friends or a smaller group.
If you’re building a public community around SEO, WordPress, or content marketing, you may prefer a community-oriented setup.
6. Enter a Server Name
Now enter a name for your Discord server.
Choose a name that tells people what the community is about.
For example, if you’re creating a community about search engine optimization, you could call it SEO Community.
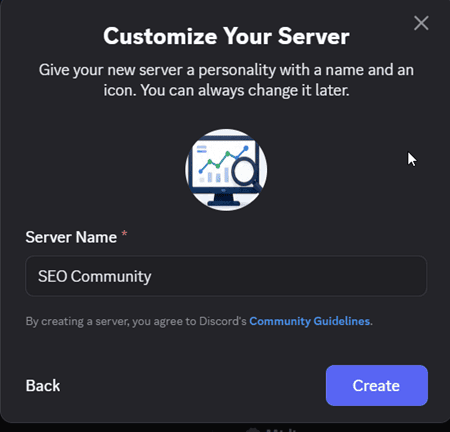
If you’re creating a server for your website readers, you could use your website or brand name.
You can change the server name later, so don’t worry if you want to refine it after the initial setup.
7. Add a Server Icon
Discord also lets you add an image for the server icon. In this example, we already added it in the previous step, while creating the name.
Choose an image that is easy to recognize at a small size. A simple logo usually works well for a business or website community.
For a personal community, you could use an image related to the group’s purpose.
You can also change the icon later through the server settings.
8. Click Create
Once you’ve entered the server name and added an icon, click Create.
Discord will create the server and place it in your server list.
Your new server is now ready.
You can start inviting people, sending messages, and creating channels. Before doing that, however, it’s worth spending a few minutes customizing the server.
How to Customize a Discord Server
A new Discord server usually starts with a basic appearance. Customizing it helps members understand what the community is about and gives the server a more polished identity.
You can change the server name and icon, add a banner, choose traits, and provide a description. The exact options available to you can depend on your server and Discord’s current feature set.
A professional-looking server doesn’t need complicated graphics. A clear name, recognizable icon, useful description, and sensible channel structure can make a new community much easier to understand.
1. Open Server Settings
Select your new Discord server from the left side of the window.
Click the server name at the top.
A menu will open with options related to the server.
Select Server Settings.
You’ll now see the settings area for your server.
2. Open Server Profile
Inside Server Settings, look for Server Profile.
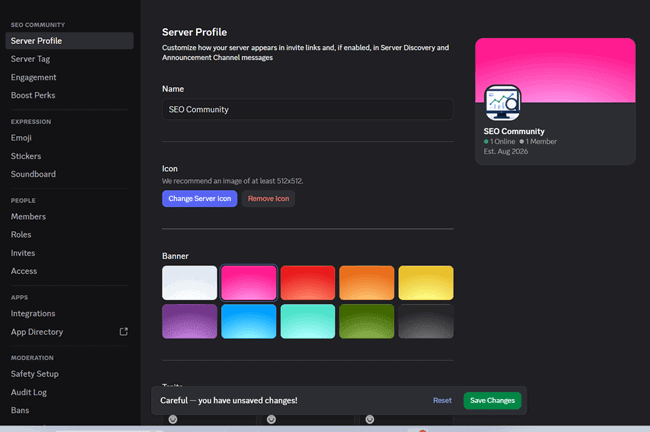
Open it.
This is where you can manage some of the information and visual elements associated with your server.
The available options can include the server name, icon, banner, description, and traits.
3. Change the Server Icon
If you want to replace the icon you selected during server creation, use the icon option in Server Profile.
Upload a suitable image from your computer.
A good server icon should be recognizable when displayed as a small circle in the Discord sidebar.
If you’re creating a server for an SEO community, for example, you could use your website logo or a simple SEO-related graphic.
4. Add a Server Banner
You can also customize the server’s visual appearance with a banner when the feature is available for your server.
Choose an image or color that fits the community.
For a technology blog community, a clean banner related to technology, blogging, or digital marketing can work well.
Avoid filling the banner with tiny text. Most members will see it at a relatively small size, so simple visuals usually work better.
5. Add Server Traits
Server traits help describe the subjects or interests connected with your community.
Choose traits that accurately represent what members will find on the server.
For example, a community focused on digital marketing might use traits related to SEO, blogging, social media, or online business.
Don’t select unrelated traits just to make the server look more active. The goal is to give visitors a quick idea of the community’s focus.
6. Add a Server Description
A description can explain what people can expect when they join.
Keep it short and clear.
For example:
A community for bloggers and digital marketers discussing SEO, content creation, WordPress, social media, and website growth.
A useful description answers one basic question:
Why should someone join this server?
7. Review Your Changes
After customizing the server profile, review the information you’ve entered.
Make sure the server name is correct and the icon represents the community.
Check the description for spelling errors and remove any information that no longer applies.
Save changes.
How to Create a Discord Channel
Once you’ve created your server, the next step is organizing conversations.
Creating a Discord channel is useful when you want to keep separate subjects in their own spaces. For example, a server for bloggers could have separate channels for SEO, WordPress, content ideas, and social media.
You don’t need to create every possible channel at the beginning. A small set of useful channels gives members a clear starting point. You can create additional channels when a real need appears.
1. Find the Channel Category
Open your Discord server.
Look at the channel list.
You’ll see a category containing one or more channels.
Categories help group related channels. For example, you could create a Marketing category containing #seo, #content-marketing, and #social-media.
2. Click the Plus (+) Button
Find the plus (+) button beside the channel category.
Click it.
Discord will open the channel creation window.
3. Choose a Channel Type
Discord will ask you to choose the type of channel you want to create.
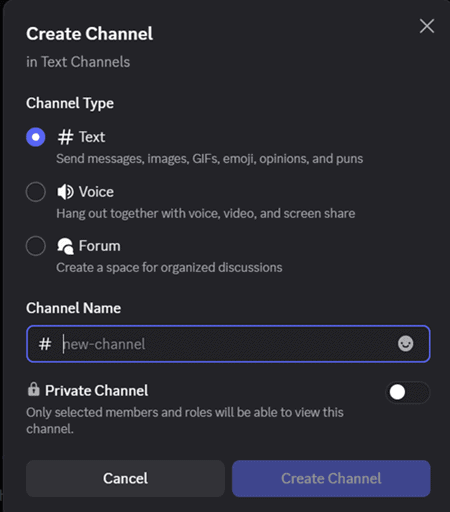
For a written discussion, select Text.
A text channel is suitable for conversations, announcements, links, images, and files.
You can also create a Voice channel if you want members to talk using voice communication.
Depending on your Discord interface and server setup, you may also see a Forum option.
Choose the type that matches the purpose of the new channel.
4. Enter a Channel Name
Now enter a name for your channel. Make the name short and easy to understand.
For a digital marketing server, examples could include:
seobloggingsocial-mediaweb-hostingcontent-ideas
A member should understand the purpose of the channel without opening it.
5. Choose Whether the Channel Is Private
Discord also provides privacy and permission controls for channels.
A private channel can be restricted so that only selected roles or members can access it.
For example, a website team could create a private #editorial-planning channel for writers and editors.
If everyone in your server should be able to use the channel, leave it as a normal public channel.
6. Create the Channel
Once you’ve selected the channel type, entered the name, and configured the available options, click Create Channel.
Discord will add the new channel to the selected category. You can now open the channel and start using it.
How to Customize a Discord Channel
Creating a channel gives you a basic conversation space, but you can adjust its settings to make its purpose clearer.
Channel customization is useful when your server has several discussions happening at the same time. A clear channel name and topic can help members know where to post.
You can also adjust permissions and other available settings based on the needs of your server.
1. Open Channel Settings
Find the channel you want to customize. Tap the gar icon next to it to open settings.
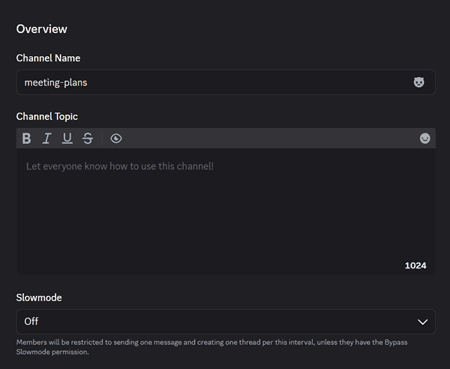
Discord will display settings on the next page. They include options to change the channel name, description, visibility and add integrations.
2. Change the Channel Name
If the original name no longer fits, you can change it.
For example, you might start with a channel called marketing and later decide that digital-marketing gives members a clearer idea of its purpose.
Changing a channel name doesn’t mean you need to create a new channel. The existing channel can continue to hold its conversation history after the name change.
3. Add a Channel Topic
A channel topic gives members more information about what belongs in the channel.
For an SEO community, a channel topic could say:
Discuss keyword research, on-page SEO, technical SEO, and Google Search.
This simple explanation can reduce confusion, especially when a server has several related channels.
4. Review Channel Permissions
Permissions control what members can do inside the channel. You can use permissions when a channel needs restricted access.
For example, a public #seo channel could allow all members to participate, while an internal #content-team channel could be limited to people working on the website.
Be careful when changing permissions. Giving a role with broad administrative access can allow members to change settings or manage parts of your server.
5. Review Other Channel Settings
Depending on the channel type and your server, you may see settings for features such as slow mode, age restrictions, integrations, or other options.
Only enable settings that have a clear purpose.
For a small blogging community, you probably don’t need to change every available option. Start with the basics and add restrictions or features when the community requires them.
6. Save the Changes
After making your changes, save them.
Click Excape to return to the channel and check how it looks.
Make sure the name and topic accurately describe the conversation.
How to Delete a Discord Channel
You may eventually create a channel that you no longer need.
For example, a temporary #seo-audit-project channel might have been useful during a website redesign. Once the project is finished, you may want to remove it.
Deleting a channel is simple, but you should be careful before confirming the action. Deleting a Discord channel permanently removes the channel and its conversation history. Make sure you don’t need the information stored there before proceeding.
1. Open the Channel Settings
Find the channel you want to remove. Open its settings menu.
Make sure you have the required permissions to delete the channel.
2. Select Delete Channel
Look through the channel settings for the Delete Channel option.
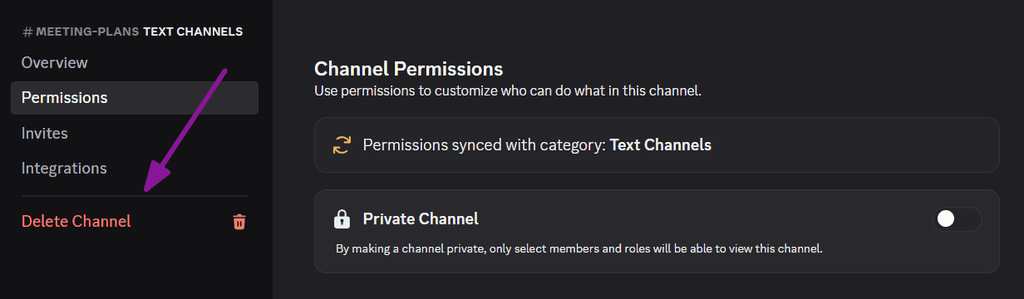
Select it.
Discord will ask you to confirm that you want to delete the channel.
3. Confirm the Deletion
Read the confirmation message carefully.
If you’re certain that the channel is no longer needed, confirm the deletion. The channel will disappear from the server immediately.
Can a Deleted Discord Channel Be Recovered?
No. Discord does not provide a normal restore option for a deleted channel.
This is why it’s worth checking the channel before you remove it.
If the channel contains useful information about an SEO project, website migration, content strategy, or other work, save anything important before deleting it.
How to Delete a Discord Server
Deleting an entire Discord server is a much bigger action than deleting a channel.
A server can contain channels, messages, members, roles, settings, and community information. If you no longer want to operate the server, you can permanently delete it.
Before doing this, make sure you are absolutely certain. A deleted Discord server cannot be restored.
Only the server owner can delete the server. Having a moderator or administrator role doesn’t automatically give someone the ability to delete the server.
1. Open the Discord Server
Select the server you want to delete from the left side of Discord. Make sure you have selected the correct server.
This is especially important if you manage several communities.
2. Open Server Settings
Click the server name at the top of the window.
Select Server Settings.
Discord will open the server management area.
3. Find Delete Server
Scroll through the server settings.
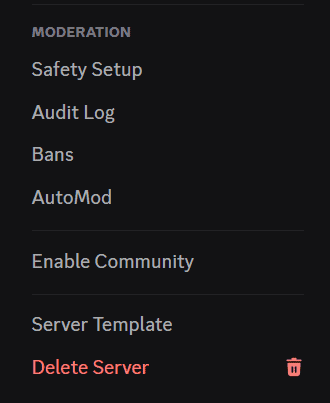
Look for Delete Server.
This option is usually placed toward the bottom of the settings because it is a permanent and destructive action.
4. Confirm That You Want to Delete the Server
Click Delete Server.
Discord will display a confirmation prompt.
Depending on your account security settings, Discord may ask you to enter the server name or provide a two-factor authentication code.
Take a moment to verify that you selected the correct server.
5. Click Delete Server
Complete the confirmation. Discord will permanently delete the server.
Once the deletion is complete, the server will disappear from your server list.
Can You Recover a Deleted Discord Server?
No.
Discord states that deleted servers cannot be restored. This includes the server’s member list and messages.
For that reason, deleting a server should be treated as a final decision.
If you’re simply taking a break from a community, you may want to keep the server and stop actively using it. You can also transfer ownership when appropriate rather than deleting the entire community.
Discord Server vs. Discord Channel
If you’re new to Discord, the terms server and channel can be confusing.
The easiest way to understand them is to think of a server as the main community and a channel as a conversation space inside that community.
| Feature | Discord Server | Discord Channel |
|---|---|---|
| Main purpose | Hosts the community | Organizes a specific conversation |
| Can it contain channels? | Yes | No |
| Can have members? | Yes | Members access channels based on permissions |
| Can be customized? | Yes | Yes |
| Can be deleted? | Yes | Yes |
| Effect of deletion | Removes the whole server | Removes the channel and its history |
For example, you could create a server called Tech Discussions.
Inside it, you could create:
#general#gadgets#news#ai#social-media
All of these channels belong to the same server. This structure lets members move between subjects without creating separate communities for each topic.
Final Thoughts
Creating a Discord server is a simple way to bring a group together under one organized space. Once your server is ready, you can customize its appearance, create channels for specific subjects, and use permissions to control access.
For a new community, keep the structure simple. Create channels for topics that people actually need and add more as the server grows. A clean structure is easier for members to understand and easier for you to manage.
If you no longer need a channel, you can delete it from its settings. Remember that deleting a channel removes its history and cannot normally be undone.
Deleting a Discord server is even more serious. Only the server owner can perform the action, and Discord does not provide a way to restore a deleted server. Check the server carefully before confirming the final step.
If you’re setting up your first Discord community, start with a clear name, recognizable icon, useful description, and a handful of well-organized channels. You can always expand the server later as your community develops.
You may also be interested in these posts ↴