
Direct Answer
To change your Facebook profile name, tap your profile picture, go to Settings & Privacy, then Settings. Click Accounts Center, choose your profile, and select Name. Enter your new name and tap Review Change. Keep in mind, you can only change your name once every 60 days. Page and Group name changes require admin privileges within their respective settings menus.
Have you recently gotten married, rebranded your small business, or decided to take your community group in a completely new direction? If so, you are probably trying to figure out how to change name for Facebook accounts across the board.
It can be incredibly frustrating when you just want to update your identity online. Whether you are a casual user wanting to update your surname, an entrepreneur trying to figure out how to change business name on Facebook, or an admin managing a massive local community, you need accurate, up-to-date instructions.
In this guide, I explain where every single button is located in 2026. I will share step-by-step instructions for desktop computers, iPhones, and Android devices. We will also dive deep into Facebook’s strict naming rules so your request doesn’t get rejected.
Feel free to scroll down to the specific section that applies to you. Let’s get your digital identity updated!
Part 1: How to Change Name for Facebook (Personal Profile)
Your personal profile is your primary identity on the platform. It is what your friends, family, and high school classmates use to find you. Because Facebook insists on transparency, they want people to use their “everyday” names.
Here is exactly how to update your personal profile name, depending on the device you are holding right now.
Changing Your Profile Name on Desktop (PC or Mac)
If you are sitting at your computer, follow these exact clicks:
- Open your web browser and go to Facebook.com. Make sure you are logged into your main personal account.
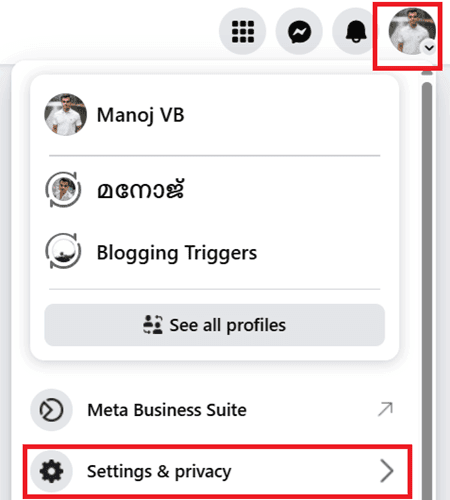
- Look at the top right corner of the screen. You will see your small profile picture. Click on it.
- A dropdown menu will appear. Click on Settings & Privacy, and then click on Settings.
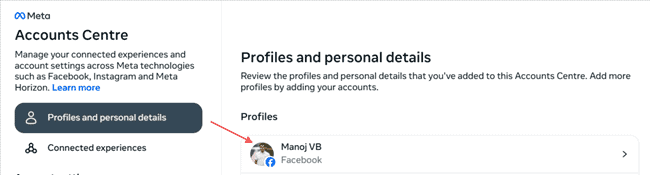
- This is where the new update kicks in. Look at the far left sidebar. You will see a box labeled Meta Accounts Center. Click Personal details.
- A new window will open. Under the “Profiles” section, click on your Facebook profile.
- A pop-up box will appear with options to change your name, username, profile picture, and avatar. Click on Name.
- You will now see text boxes for your First Name, Middle Name, and Last Name. Click inside the boxes and type your new name.
- Click the blue Review Change button.
- Facebook will show you a preview of how your name will look. (For example, it might ask if you prefer “John Doe” or “Doe John”). Choose your preferred display order.
- Enter your Facebook password to confirm your identity, and click Save Changes.
Changing Your Profile Name on Mobile (iPhone & Android)
Most of us use the mobile app. The steps here are very similar, just formatted for a smaller screen.
- Open the Facebook app on your smartphone.
- Tap the Menu button. (On an iPhone, this is your profile picture in the bottom right corner. On an Android, it is the three horizontal lines or your profile picture in the top right corner.)
- Scroll down to the bottom and tap Settings & Privacy, then tap Settings.
- At the very top of the screen, you will see the Meta Accounts Center box. Tap it.
- Tap on Profiles, and select your Facebook account.
- Tap on Name.
- Enter your updated First, Middle, or Last name into the designated fields.
- Tap Review Change.
- Select how you want your name to appear on your profile, type in your password, and hit Save Changes.
Important Rules for Personal Name Changes
You cannot just change your name to anything you want. Facebook’s algorithm will automatically reject your name change if you violate its strict policies.
The 60-Day Rule:
This is the most important rule to remember. Once you change your name on Facebook, you cannot change it again for 60 days.
There is no way to bypass this waiting period. Please double-check your spelling before you hit the save button!
What is Not Allowed:
When typing your new name, the system will block it if it contains:
- Symbols, numbers, unusual capitalization, or repeating characters.
- Characters from multiple different languages in the same name.
- Titles of any kind (e.g., Professional titles like “Dr.”, “Pastor”, or religious titles).
- Words or phrases instead of a name (e.g., “The Best Plumber”).
- Offensive or suggestive words.
How to Add a Nickname or Maiden Name on Facebook
If you just got married and changed your last name, but you still want old friends to be able to find you, you do not have to put your maiden name in the official “Last Name” box. Instead, you can add an alternate name.
To do this, go back to the Name settings inside the Accounts Center. Below the main name boxes, you will see an option that says Manage other names.
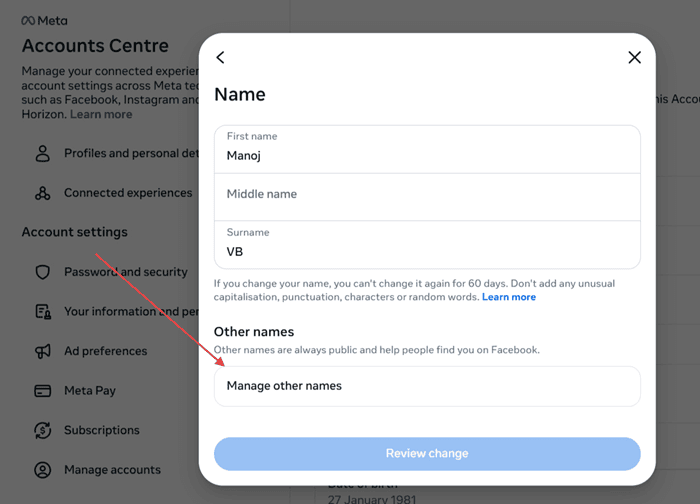
Click this, and you can add a nickname, a maiden name, a professional name, or an alternate spelling.
You can even check a box that says “Show at top of profile,” which will display this alternate name in parentheses next to the main name on your timeline.
Part 2: How to Change Business Name on Facebook
Running a business is a fluid journey. Sometimes you expand your services, undergo a massive corporate rebrand, or simply realize that your original page name isn’t helping your search engine optimization (SEO).
Figuring out how to change a business’s Facebook page name is easily the most common struggle for digital marketers right now. The introduction of the “New Pages Experience” completely changed the workflow. You can no longer just edit the page from your personal profile’s settings.
Here is the ultimate guide on how to rename a page name in Facebook without pulling your hair out.
Step-by-Step: Changing a Business Page Name on Desktop
You must have “Full Control” (Admin access) of the business page to do this. An editor or moderator cannot change the name.
- Log in to Facebook.com on your computer.
- Look at the top right corner and click your profile picture.
- Click See all profiles. You will see a list of the business pages you manage. Click on the business page you want to rename. (This step “switches” you into the page’s profile).
- Now that you are acting as the Business Page, click the page’s profile picture in the top right corner again.
- Click Settings & Privacy, then click Settings.
- You will land on the “General Page Settings” menu. Locate the Page setup option under the Audience and Visibility section.
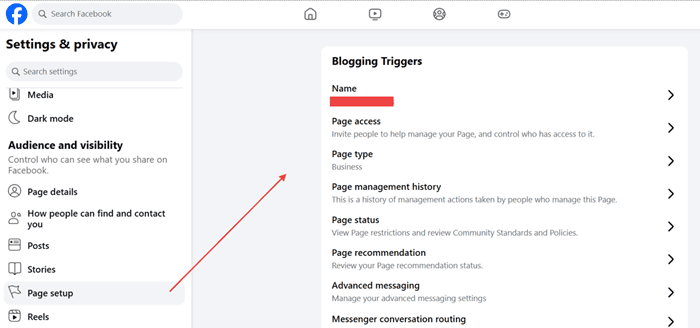
- On the main screen, you will see Name at the top. Click there.
- A new page will open with options to change your page name and username. Click Edit that appears next to your page name.
- Click Review Change.
- A pop-up box will appear showing your current name and your requested new name. It will ask for your personal Facebook password to verify your identity. Enter it and click Request Change.
Step-by-Step: Changing a Business Page Name on Mobile App
If you are on the go and need to figure out how to rename page name in Facebook using your iPhone or Android, follow these steps:
- Open the Facebook app.
- Tap the Menu button (bottom right for iOS, top left for Android).
- Tap the downward-facing arrow next to your personal name at the top. This opens your profile switcher. Tap on your Business Page to switch into it.
- Once you are operating as the page, tap the Menu button again.
- Scroll down to Settings & Privacy and tap Settings.
- Tap Page Setip under the Audience and Visibility menu
- Under the Name option.
- Type in your new desired business name.
- Tap Review Change, enter your personal password, and submit the request.
Why Was My Facebook Page Name Change Rejected?
Unlike personal profiles, business page name changes are not always instant. They undergo a review process by Facebook’s automated system, and sometimes by human reviewers. This process can take anywhere from a few minutes to three full days.
If your request was rejected, it is likely because you violated Meta’s strict business branding rules. When learning how to change a Facebook page name, you must understand why Facebook restricts things. They do this to prevent scammers from building a page with 100,000 followers under a fake topic (like “Cute Puppy Videos”) and then changing the name to sell cryptocurrency.
Your new name will be rejected if:
- It is entirely different from the old name: You cannot change “Mike’s Auto Repair” to “Sarah’s Flower Shop.” The new name must clearly relate to the old name or the services provided.
- You include unnecessary slogans: Your name cannot be “Pete’s Plumbing – The Best Plumbers in New York.” Keep it strictly to the business name.
- You use all capital letters: Unless your brand is an actual acronym (like IBM or NASA), you cannot use all caps (e.g., “PETE’S PLUMBING”). Standard grammatical capitalization is required.
- You include symbols: No exclamation points, trademark symbols (™), or emojis are allowed in the official page name.
- You add geographic locations unnecessarily: You generally cannot add a city name unless it is legally part of your registered business name.
How to Successfully Rebrand a Business Page (The “Stepping Stone” Trick)
If you are undergoing a massive rebrand where the new name is completely different from the old name, Facebook will reject it. So, how do you fix this?
You have to use the “Stepping Stone” trick. You must bridge the gap between the old brand and the new brand over a few weeks.
- Step 1: Change your name to include both brands. For example, change “Mike’s Auto Repair” to “Mike’s Auto Repair is now Elite Mechanics.”
- Step 2: Submit the request. Because the old name is still present, Facebook’s algorithm will usually approve it.
- Step 3: Wait the mandatory 7 days (Facebook requires a 7-day cooldown between page name changes).
- Step 4: After 7 days, submit a new request to change the name from “Mike’s Auto Repair is now Elite Mechanics” to simply “Elite Mechanics.”
This method proves to Facebook and your followers that a legitimate transition is happening, rather than a malicious account takeover.
Don’t Forget to Change Your Page Username (Vanity URL)
Once you figure out how to change business name on Facebook and get it approved, your job isn’t completely done.
Your Page Name is what displays in bold letters on your profile. But your Username (also known as your Vanity URL) is the web address people type to find you (e.g., facebook.com/PetesPlumbing).
If you changed your page name to “Elite Mechanics,” but your URL still says PetesPlumbing, it looks incredibly unprofessional to your customers.
To change the Username:
- Switch into your Business Page.
- Go back to Settings & Privacy > Settings.
- Then, tap Page Setup under Audience and Visibility menu on the left sidebar.
- Click Name on the main screen.
- Right underneath where you clicked “Name,” you will see a box for Username.
- Click Edit.
Type in your new desired username. It must be unique (no one else on Facebook can have it). If the box turns green, the name is available.
Save your changes. Now your branding is 100% consistent across the platform.
Part 3: How to Change Facebook Group Name
Facebook Groups are the lifeblood of the platform today. From local neighborhood watch groups to massive global fan clubs, groups keep people engaged.
However, communities evolve. A group that started as “Moms of Chicago” might want to expand to “Parents of Illinois.” If you are the creator or the lead admin of a community, you need to know how to change a Facebook group name without confusing your members.
Note: You must be an Admin of the group to change the name. Moderators do not have the necessary permission levels.
Changing a Group Name on Desktop (PC/Mac)
Managing a group is generally easier on a computer because of all the administrative tools available on the dashboard. Here is how to update the title:
- Log in to Facebook.com and look at the left-hand menu on your home feed. Click on Groups.
- Under the “Groups You Manage” section, click on the specific group you want to rename.
- Look at the administrative menu on the left side of the screen. Scroll down until you find Group Settings (it usually has a gear icon next to it). Click it.
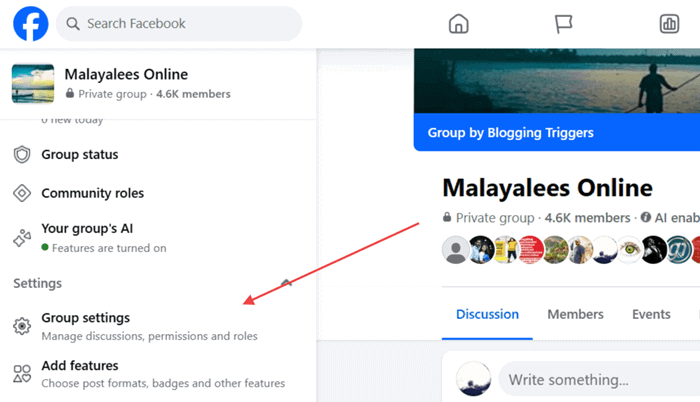
- At the very top of the settings page, under the “Set Up Group” section, you will see Name and Description.
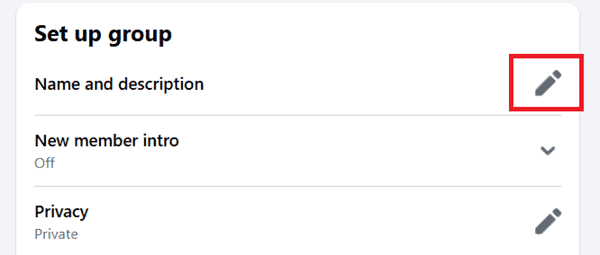
- Click the pencil icon next to Name and Description.
- Delete the old name and type your new group name into the text box.
- Click the blue Save button.
Changing a Group Name on Mobile (iPhone & Android)
If you run your community from your smartphone, the process is slightly different but still very straightforward.
- Open the Facebook app.
- Tap the Menu button, and then tap the Groups tile.
- Tap Your Groups at the top of the screen, and select the group you manage.
- Once inside your group, look at the top right corner. You will see a small shield icon with a star in it (this is your Admin Tools button). Tap it.
- Scroll all the way down to the bottom and tap on Group Settings (the gear icon).
- Tap on Name and Description.
- Tap on the group name, delete the old text, and enter the new name.
- Tap Save in the top right corner.
Rules and Limitations for Group Name Changes
Just like personal profiles and business pages, Facebook has rules in place to protect group members from sudden, confusing changes. When learning how to change Facebook group name, keep these three crucial limitations in mind:
1. The 28-Day Waiting Period
Once you successfully change the name of your Facebook group, the name is locked in. You cannot change it again for 28 days.
Make absolutely sure your admin team agrees on the new name, and check for typos before you hit the save button!
2. Automatic Member Notifications
You cannot change a group name in secret. The moment you click save, Facebook automatically sends a notification to every single member of your group telling them that the admin has changed the name.
Furthermore, Facebook will post an automated system message to the group’s main discussion feed announcing the change.
Pro Tip: To avoid confusing your members, it is highly recommended that you create an announcement post a few days before you change the name, explaining why the community is rebranding.
3. The 5,000 Member Limit (The Old Rule)
In the past, Facebook had a strict rule that if your group surpassed 5,000 members, the name was permanently locked and could never be changed. Good news: As of 2026, Facebook has removed this restriction. You can now change the name of a group regardless of how massive it has become, as long as you adhere to the 28-day waiting period.
Final Thoughts
Navigating Meta’s ever-changing menus can feel like a part-time job, but keeping your online identity accurate is crucial.
Whether you are updating your personal profile after a major life event, figuring out how to change business name on Facebook to scale your company, or rebranding a group to better serve your community, the steps are straightforward once you know where to look.
Just remember the golden rules: double-check your spelling, prepare for the mandatory waiting periods (60 days for profiles, 28 days for groups), and if you are a business, always ensure your new name clearly reflects your brand to avoid the dreaded rejection notice.
Have you tried to change your name recently? Did Facebook approve it instantly, or did you have to use the “stepping stone” trick to get your business rebrand approved? Let us know your experience in the comments below!
You may also be interested in these posts ↴

